Retrieve Slice:Select by ID,但不把逻辑塞进详情 Component
详情页通常通过 Route 打开。
经典 Pattern 大家都很熟悉:
URL /articles/:id → Detail-Komponente liest Route Param → Komponente triggert loadById(id) → Store oder Service lädt Daten → Detail-Template rendert这并没有错。
恰恰相反。
这种 Flow 有明显优势:
- Deeplink 可以工作;
- Browser Reload 可以工作;
- 外部链接可以工作;
- URL 能描述进入页面的入口状态。
这些都是实实在在的理由。
但这篇文章会有意展示另一种切法。
不是因为 Route Param 不好。
而是因为我想强调另一个重点:
多一点响应式思维。
多从派生出发思考。
让 Component 保持扁平。
当用户从一个已经加载好的列表里选择某个元素时,这个选择本身就是业务相关的 State。
详情页不必在 Init 时自己读取 Route 中的 ID,再从 ID 发起 Load,最后自己构造 ViewModel。
它可以直接 Rendering 一个 Projection:
articles + selectedArticleId → selectedArticle → selectedArticleVm → Detail Template这就是本文的重点。
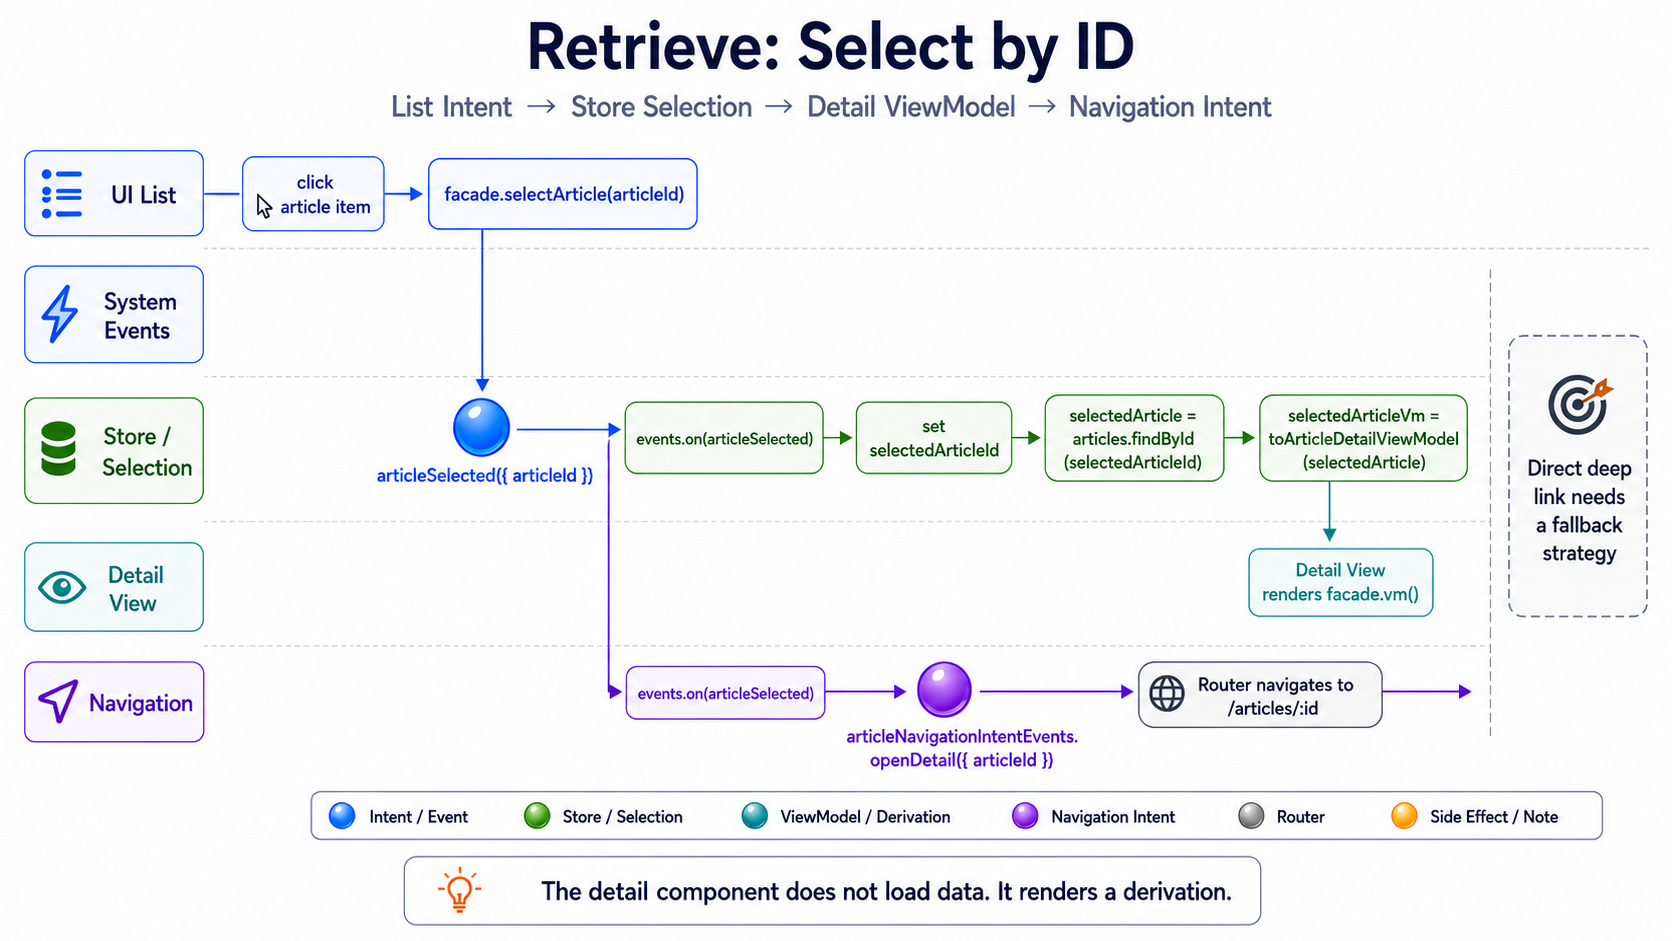
最重要的一点:
详情 Component 不负责加载。
它不读取 Route Param ID。
不触发 loadById()。
不决定如何查找 Article。
它只 Rendering ViewModel。
选择在更早之前产生:
List Item Click → selectArticle(articleId) → articleSelected({ articleId }) → selectedArticleId → selectedArticleVmNavigation 则是对同一次选择的另一个反应。
它不是选择的 Source。
另一种观点并没有错
Section titled “另一种观点并没有错”经典 Route-Param Flow 并不差。
它解决了一个真实问题:
用户如何直接进入某个详情页?
如果答案是“通过 URL”,那么 URL 必须包含足够的信息,才能重新恢复这个状态。
这正是经典 Flow 的优势:
Route Param → loadById → Detail ViewModel代价是,详情页很容易重新承担更多职责。
Route Param、Load、Selection、Error State 和 ViewModel 构建都可能在那里汇合。
本文展示的 Flow 则支付另一种成本。
它让应用内部的 Selection 非常干净、非常响应式。
但直接从 URL 进入时,就需要额外的 Fallback Strategy。
两种方式都没有原则性错误。
它们只是针对不同的系统压力做优化。
Route Param Flow  → optimiert auf Wiederherstellbarkeit über URL
Selection Flow  → optimiert auf reaktive Ableitung im laufenden UI-Zustand
真正重要的是,知道自己选择了什么。
这篇文章刻意不展示什么
Section titled “这篇文章刻意不展示什么”本文不会展示完整的 Deeplink Fallback。
也就是说,不会展开:
Direkter Einstieg auf /articles/foo → Route Param lesen → Artikel laden → selectedArticleId setzen → Detail rendern这在业务上当然完全合理。
但它属于另一条 Slice。
实现方式可以有很多:
- 把 Route Param 作为 Fallback;
- 为直接进入详情建立独立 Detail Retrieve Slice;
- Resolver;
- 初始
loadRequested; - 从 URL Rehydrate;
- 使用
byIdCollection 与selectedId; - 独立 Detail Store。
都可以。
但都不是本文重点。
这里讨论的是应用内部 Flow:
列表已经加载。用户选择一个元素。详情是这个选择的派生。
这个 Slice 可以采用如下结构:
article/├── entities/│ └── article.model.ts├── infrastructure/│ ├── article.dto.ts│ ├── article.mapper.ts│ └── article.resource.ts├── +state/│ ├── article.store.ts│ ├── article-list.vm.ts│ ├── article-detail.vm.ts│ ├── article-list-view-model.mapper.ts│ ├── article-detail-view-model.mapper.ts│ ├── article-selection.events.ts│ └── article-navigation-intent.events.ts├── application/│ ├── article-list.facade.ts│ └── article-detail.facade.ts└── presentation/ ├── article-list-page.component.ts ├── article-list-page.component.html ├── article-detail-page.component.ts └── article-detail-page.component.html整体结构有意与 Retrieve Slice 保持相似。
区别在于 Selection:
ArticleResource  → kapselt private httpResource  → stellt articles, isLoading, error und reload bereit
ArticleStore  → hält selectedArticleId  → orchestriert articles und Selection  → leitet listVm und selectedArticleVm ab
详情 Component 不会拿到 ID 再自己查找。
它拿到的是 ViewModel。
Infrastructure Boundary:Resource 继续被封装
Section titled “Infrastructure Boundary:Resource 继续被封装”这个 Slice 沿用 Retrieve 文章 的同一条边界。
具体的 Angular Resource 完整留在 Infrastructure。
import { computed, Injectable } from '@angular/core';import { httpResource } from '@angular/common/http';
import { Article } from '../entities/article.model';import { mapArticleResponse } from './article.mapper';
@Injectable()export class ArticleResource {  private readonly resource = httpResource<readonly Article[]>(    () => ({      url: 'https://lorem-api.com/api/article',      method: 'GET',    }),    {      parse: mapArticleResponse,    },  );
  readonly articles = computed<readonly Article[] | null>(() => {    if (!this.resource.hasValue()) {      return null;    }
    return this.resource.value();  });
  readonly isLoading = this.resource.isLoading;  readonly error = this.resource.error;
  reload(): void {    this.resource.reload();  }}
这里的 hasValue() 保护的是对 value() 的技术访问。
这是 Angular Resource 的 Framework Semantics。
因此它应该留在创建 Resource 的地方。
之后 Store 只认识面向应用的 API:
articles: Signal<readonly Article[] | null>isLoading: Signal<boolean>error: Signal<Error | undefined>reload(): void因此,我们区分两类 Guard:
technischer Resource-Guard  → kann die Angular Resource sicher gelesen werden?  → Infrastructure
Projektions-Guard  → gibt es eine Source, eine Auswahl und einen passenden Artikel?  → pure ViewModel-Projektion
两种 Guard 都合理。
只是回答不同问题。
Store 不应该把其中任何一种写成到处可见的 Case Logic。
它只编排命名明确的 Source Signal、Selection State 与 Projector。
1. Selection Event:把选择建模为业务 Intent
Section titled “1. Selection Event:把选择建模为业务 Intent”用户点击一个 List Item。
这不只是一次 UI Click。
它表达了一次业务选择。
import { eventGroup, type } from '@ngrx/signals/events';
export const articleSelectionEvents = eventGroup({  source: 'Article Selection',  events: {    articleSelected: type<{ readonly articleId: string }>(),  },});
articleSelected 并不意味着:
现在导航。
也不意味着:
现在加载。
它只意味着:
这个 Article 被选中了。
之后发生什么,是彼此分离的反应。
2. Navigation Intent:Routing 是一种反应
Section titled “2. Navigation Intent:Routing 是一种反应”Article 被选中后,应用应该进入详情 Route。
但这件事我们同样先描述成 Intent。
import { eventGroup, type } from '@ngrx/signals/events';
export const articleNavigationIntentEvents = eventGroup({  source: 'Article Navigation Intent',  events: {    openDetail: type<{ readonly articleId: string }>(),  },});
这样方向会保持清晰:
articleSelected → openDetail → Router navigiertStore 本身不需要认识 Router。
列表 Component 也不需要。
3. ViewModel:列表和详情不是同一个模型
Section titled “3. ViewModel:列表和详情不是同一个模型”一个 List Item 需要的数据,与详情页需要的数据不同。
因此我会拆分 ViewModel。
article-list.vm.ts
Section titled “article-list.vm.ts”export interface ArticleListItemVm { readonly id: string; readonly title: string; readonly subtitle: string;}article-detail.vm.ts
Section titled “article-detail.vm.ts”export interface ArticleDetailVm { readonly id: string; readonly title: string; readonly subtitle: string; readonly heroImageUrl: string; readonly paragraphs: readonly string[];}这不是为了多造几个类型。
列表不应该意外获得详情页才需要的知识。
详情页也不应该被迫使用一个列表模型。
两个 View 都是同一个 Entity 的 Projection。
但它们回答的是不同 UI 问题。
4. Mapper:从 Source 与 Selection 生成 ViewModel
Section titled “4. Mapper:从 Source 与 Selection 生成 ViewModel”Mapper 继续保持很小。
但现在,它们也会承担与 UI Contract 有关的 Projection Guard。
这样 Store 不必自己写关于 Source 可用性、Selection 是否存在或是否命中的 Condition。
article-list-view-model.mapper.ts
Section titled “article-list-view-model.mapper.ts”import { Article } from '../entities/article.model';import { ArticleListItemVm } from './article-list.vm';
export const toArticleListViewModel = (articles: readonly Article[] | null): readonly ArticleListItemVm[] | null => { if (articles === null) { return null; }
return articles.map(toArticleListItemViewModel);};
const toArticleListItemViewModel = ({ slug, title, subtitle }: Article): ArticleListItemVm => ({ id: slug, title, subtitle,});这里的 null 表示:
Source 当前还没有提供可读取的 Article List。
而成功加载后的空 Array 仍然是一个有效的 List ViewModel:
null  → Source aktuell nicht verfügbar
[]  → Source verfügbar, aber keine Artikel vorhanden
article-detail-view-model.mapper.ts
Section titled “article-detail-view-model.mapper.ts”import { Article } from '../entities/article.model';import { ArticleDetailVm } from './article-detail.vm';
interface SelectedArticleViewModelInput { readonly articles: readonly Article[] | null; readonly selectedArticleId: string | null;}
export const toSelectedArticleViewModel = ({ articles, selectedArticleId }: SelectedArticleViewModelInput): ArticleDetailVm | null => { if (articles === null || selectedArticleId === null) { return null; }
const selectedArticle = articles.find(({ slug }) => slug === selectedArticleId) ?? null;
if (selectedArticle === null) { return null; }
return toArticleDetailViewModel(selectedArticle);};
const toArticleDetailViewModel = ({ slug, title, subtitle, heroImageUrl, paragraphs }: Article): ArticleDetailVm => ({ id: slug, title, subtitle, heroImageUrl, paragraphs,});这些 Condition 不是技术性的 Resource Guard。
它们描述 Detail Projection 是否有效:
keine Source  → kein Detail-ViewModel
keine Selection  → kein Detail-ViewModel
Selection findet keinen Artikel  → kein Detail-ViewModel
Source und passende Selection vorhanden  → ArticleDetailVm
重要的是方向:
articles  → ArticleListItemVm[]
articles + selectedArticleId  → ArticleDetailVm | null
而不是:
Template → article.title → article.content.split(...) → if author existsTemplate 应该负责 Rendering。
不应该自己查找、保护或翻译数据。
5. Store:编排 Selection 与派生
Section titled “5. Store:编排 Selection 与派生”Store 消费 Infrastructure Adapter 提供的安全 articles Signal。
除此之外,它还持有当前 Selection。
它不知道 HttpResourceRef。
不知道 hasValue()。
也不会自己判断什么时候 Source 与 Selection 足以形成一个有效 Detail ViewModel。
import { computed, inject } from '@angular/core';import { patchState, signalStore, withComputed, withProps, withState } from '@ngrx/signals';import { Events, withEventHandlers } from '@ngrx/signals/events';import { map, tap } from 'rxjs';
import { ArticleResource } from '../infrastructure/article.resource';import { articleNavigationIntentEvents } from './article-navigation-intent.events';import { articleSelectionEvents } from './article-selection.events';import { toSelectedArticleViewModel } from './article-detail-view-model.mapper';import { toArticleListViewModel } from './article-list-view-model.mapper';
interface ArticleState {  readonly selectedArticleId: string | null;}
const initialState: ArticleState = {  selectedArticleId: null,};
export const ArticleStore = signalStore(  withState(initialState),
  withProps(() => ({    _articleResource: inject(ArticleResource),  })),
  withComputed(({ _articleResource, selectedArticleId }) => ({    isLoading: _articleResource.isLoading,    error: _articleResource.error,
    listVm: computed(() => toArticleListViewModel(_articleResource.articles())),
    selectedArticleVm: computed(() =>      toSelectedArticleViewModel({        articles: _articleResource.articles(),        selectedArticleId: selectedArticleId(),      }),    ),  })),
  withEventHandlers((store, events = inject(Events)) => ({    setSelectedArticleOnSelected$: events.on(articleSelectionEvents.articleSelected).pipe(      tap(({ articleId }) => {        patchState(store, {          selectedArticleId: articleId,        });      }),    ),
    openDetailOnSelected$: events.on(articleSelectionEvents.articleSelected).pipe(      map(({ articleId }) =>        articleNavigationIntentEvents.openDetail({          articleId,        }),      ),    ),  })),);
这是最关键的位置。
此时 Store 读起来像一份 Orchestration:
articles  → toArticleListViewModel()  → listVm
articles  + selectedArticleId  → toSelectedArticleViewModel()  → selectedArticleVm
技术性的 Resource Guard 留在 Infrastructure。
Projection Rule 留在命名明确的 Mapper。
Store 只连接 Source、State、Projection 与 Intent。
详情页之后只会拿到:
facade.vm()6. 两个 Listener,两种职责
Section titled “6. 两个 Listener,两种职责”重要的是:同一个 Event 会有两个反应。
一个反应修改本地 Selection State。
另一个反应生成 Navigation Intent。
两者刻意分开。
articleSelected  → setSelectedArticleId
articleSelected  → openDetail
在经典 Redux Architecture 中,本质上也会类似:
action: articleSelected
reducer:  selectedArticleId setzen
effect:  Router-Navigation auslösen
差别只是技术形式。
职责没有变。
一个 Event 可以产生多个反应。
但单个反应不应该隐藏多个职责。
所以这里不会写成一个什么都做的 Handler:
articleSelected → patch selectedArticleId → navigate而是拆成两个独立反应:
articleSelected  → State ändern
articleSelected  → neues Navigation Event erzeugen
这样 Flow 更容易测试。
架构也更容易阅读。
7. 为什么一个用 tap,另一个用 map?
Section titled “7. 为什么一个用 tap,另一个用 map?”Store 内发生的是两种不同事情。
设置 State 是 Store 内部的 Side Effect:
setSelectedArticleOnSelected$: events .on(articleSelectionEvents.articleSelected) .pipe( tap(({ articleId }) => { patchState(store, { selectedArticleId: articleId }); }), ),这里使用 tap 很合适。
这个反应确实在修改 Store State。
Navigation 则不会在这里直接执行。
它先被描述为一个新的 Event:
openDetailOnSelected$: events .on(articleSelectionEvents.articleSelected) .pipe( map(({ articleId }) => articleNavigationIntentEvents.openDetail({ articleId }), ), ),这里使用 map 更合适。
从一个 Event 产生另一个 Event。
tap  → echte imperative Grenze im aktuellen Kontext
map  → neues Event als Reaktion
因此 Store 不会直接调用 Router。
它只生成 Navigation Intent。
8. Facade:列表发送 Intent,详情读取派生
Section titled “8. Facade:列表发送 Intent,详情读取派生”现在按照实际使用方式拆分 Facade。
List Facade 暴露列表以及选择操作。
import { Injectable, inject } from '@angular/core';import { injectDispatch } from '@ngrx/signals/events';
import { ArticleStore } from '../+state/article.store';import { articleSelectionEvents } from '../+state/article-selection.events';
@Injectable()export class ArticleListFacade {  private readonly store = inject(ArticleStore);  private readonly dispatchSelection = injectDispatch(articleSelectionEvents);
  readonly articles = this.store.listVm;  readonly isLoading = this.store.isLoading;  readonly error = this.store.error;
  readonly selectArticle = (articleId: string): void => {    this.dispatchSelection.articleSelected({ articleId });  };}
Detail Facade 只暴露 Detail ViewModel。
import { Injectable, inject } from '@angular/core';
import { ArticleStore } from '../+state/article.store';
@Injectable()export class ArticleDetailFacade {  private readonly store = inject(ArticleStore);
  readonly vm = this.store.selectedArticleVm;}
这就是边界:
List Facade  → articles  → selectArticle(articleId)
Detail Facade  → vm
Detail Facade 没有 loadById() 方法。
这是刻意的。
详情页是一个派生。
不是 Load Orchestrator。
9. Presentation:列表设置 Selection
Section titled “9. Presentation:列表设置 Selection”列表 Rendering Items,并在点击时发送 Selection。
@let articles = facade.articles(); @if (articles) { @for (article of articles; track article.id) {<button type="button" class="article-list__item" (click)="facade.selectArticle(article.id)"> <span>{{ article.title }}</span> <small>{{ article.subtitle }}</small></button>} } @else {<app-list-placeholder />}没有 RouterLink。
没有 navigate()。
没有 loadById()。
这次点击在业务上表达的是:
Benutzer wählt Artikel → articleSelected({ articleId })之后发生什么,不属于 List Template 的职责。
10. Presentation:详情只 Rendering 派生
Section titled “10. Presentation:详情只 Rendering 派生”详情页只读取自己的 ViewModel。
@let vm = facade.vm();
@if (vm) {  <article class="article-detail">    <img      class="article-detail__image"      [src]="vm.heroImageUrl"      [alt]="vm.title"    />
    <h1>{{ vm.title }}</h1>
    <p class="article-detail__subtitle">      {{ vm.subtitle }}    </p>
    <div class="article-detail__content">      @for (paragraph of vm.paragraphs; track paragraph) {        <p>{{ paragraph }}</p>      }    </div>  </article>} @else {  <p>Kein Artikel ausgewählt.</p>}
Template 不知道:
- ID 从哪里来;
- Article 如何加载;
findById如何工作;- Navigation 什么时候发生;
- 是否存在 Route Param。
它只 Rendering:
selectedArticleVm → Template这就是本文希望强调的教学点。
11. Routing 作为反应
Section titled “11. Routing 作为反应”到目前为止,我们只生成了 Navigation Intent:
articleSelected → articleNavigationIntentEvents.openDetail({ articleId })最终总要有一个地方把它变成真正的 Navigation。
那是一个命令式 Boundary。
可以用一个很小的 Navigation Handler 来完成。
import { inject, Injectable } from '@angular/core';import { Router } from '@angular/router';import { Events, withEventHandlers } from '@ngrx/signals/events';import { tap } from 'rxjs';
import { articleNavigationIntentEvents } from '../+state/article-navigation-intent.events';
@Injectable()export class ArticleNavigationHandler {  private readonly router = inject(Router);  private readonly events = inject(Events);
  readonly openDetailOnIntent$ = this.events.on(articleNavigationIntentEvents.openDetail).pipe(    tap(({ articleId }) => {      void this.router.navigate(['/articles', articleId]);    }),  );}
这里的代码有意只是 Sketch。
根据项目,Navigation 也可以通过 Router Store、全局 Navigation Handler 或其他 Infrastructure 处理。
重要的是:
Navigation Intent → Router而不是:
List Component → router.navigate(...)也不是:
Detail Component → Route Param lesen → loadById(...)对于这个 Slice 来说,Routing 是对 Selection 的反应。
12. 这种切法的代价
Section titled “12. 这种切法的代价”这种 Flow 有代价。
如果用户直接进入 /articles/foo,Store 里还不存在 Selection。
此时只靠 selectedArticleVm() 不够。
真正支持 Deeplink 需要额外 Strategy:
Direkter Einstieg → URL enthält articleId → Store hat noch keine selectedArticleId → articles sind vielleicht noch nicht geladen这不是小细节。
它是真实需求。
可以采用的方案包括:
- Route Param 作为 Fallback;
- 针对直接进入页面建立 Detail Retrieve Slice;
- Resolver;
- 初始
loadRequested; - 从 URL Rehydrate;
- 使用
byId的 Store; - 从 Route 恢复 Selection。
本文刻意不展开。
不是因为不重要。
而是因为它属于另一条 Flow。
这里讨论的是:
Liste geladen → Benutzer klickt Element → Selection wird gesetzt → Detail rendert Ableitung → URL folgt als Reaktion经典 Route-Param Flow 优先优化 Deeplink 与状态恢复。
本文的 Flow 优先优化正在运行的 UI State 中的响应式派生。
两种都合理。
13. 为什么我喜欢用这个 Flow 教学
Section titled “13. 为什么我喜欢用这个 Flow 教学”我喜欢用这条 Flow 教学,因为它会迫使团队换一种方式思考 Frontend State。
不是:
Komponente startet → Komponente liest irgendwas → Komponente lädt irgendwas → Komponente baut irgendwas而是:
Zustand verändert sich → Ableitungen aktualisieren sich → Templates rendern这更响应式。
也会让 Component 保持扁平。
Component 不再问:
Init 时我必须做什么?
而是问:
我需要 Rendering 哪个 Signal?
Store 不再问:
当前哪个 Component 需要哪些数据?
也不会问:
现在能安全读取这条 Angular Resource 吗?
它问的是:
从 Infrastructure 提供的 Source Signal 与当前 Selection State 中,可以产生什么 Projection?
这是另一种思维方式。
因此我认为这个 Slice 很适合作为教学例子。
不是 Dogma。
而是一种练习:
Auswahl als Zustand denken.Detail als Ableitung denken.Routing als Reaktion denken.Komponente flach halten.Select by ID 不一定要发生在详情 Component 中。
对于“从已加载列表进入详情”的 In-App Flow,可以先让 Selection 成为业务 State:
List Item Click → articleSelected({ articleId }) → selectedArticleId → selectedArticle → selectedArticleVm → Detail TemplateRouting 再对此作出反应:
articleSelected → openDetail({ articleId }) → Router Navigation详情 Component 不负责加载。
不读取 Route Param ID。
不执行 loadById()。
它只 Rendering 一个派生。
Infrastructure 继续封装具体的 httpResource。
Store 只编排 articles Signal、Selection State 和命名明确的 ViewModel Projection。
这并不总是正确的默认方案。
如果 Deeplink 与 Reload 是主要需求,就需要 URL-driven 的恢复 Strategy。
但对于正在运行的 UI State,这种切法非常适合训练响应式思维:
Denkt mehr reaktiv.Denkt in Ableitungen.Haltet Komponenten flach.两种方式都没有根本错误。
它们只是针对不同问题优化。